
8 Ways to Get Free Photo Edits in 2025
October 15, 2025
What Is Product Photography? Types and Meaning 2025
October 23, 2025How to Reduce Image File Size Without Losing Quality
We all want sharp, fast-loading photos, don’t we?
You’ve uploaded beautiful images to your website or social media, but something still feels off. Maybe your pages take too long to load, or the pictures look slightly dull compared to your competitors’ posts. You might wonder, “Do I need a better camera, or should I change my editing process?” Often, the problem isn’t your photos—it’s their file size and optimization.
Imagine your website or social media posts looking amazing and loading fast — all without losing image quality. Whether you’re a photographer, an eCommerce business owner, or a designer, learning how to reduce image file size without losing quality is one of the most useful skills you can have. In this post, I’ll show you exactly how to resize images, compress photos for web, and optimize images for SEO — the same way I do it every day at Color Edit Pro for my clients.
Understanding Image Size and Quality
Before resizing or compressing your photos, let’s define two key terms: image size and image quality.
What Is Image Size?
Image size means how large your photo is — both in dimensions (width and height in pixels) and file size (in KB or MB). For example: A 3000×2000 pixel image might look great but could be 4 MB in size. That’s too heavy for most websites. When you resize an image for web to 1000×667 pixels, the file can shrink to about 200 KB while still looking crisp. This process — called image compression — helps you make smaller files that load quickly without quality loss.
What Is Image Quality?
Image quality is how clear, detailed, and sharp your photo appears. It depends on:
1. Resolution (how many pixels the image has)
2. Compression (how much data is reduced)
3. File format (JPEG vs PNG vs WEBP)
If you compress images too much, you’ll see blurry edges or color fading. The key is to balance file size and visual quality — something we specialize in at Color Edit Pro using tools like Photoshop and AI image optimization software.
Common Problems My Clients Face Before Editing Their Photos
Over the years, I’ve worked with many clients — photographers, online shop owners, and small business owners — and most of them face the same issues when it comes to image optimization and photo resizing.
1. My Website Loads Too Slowly
Many clients tell me their website takes forever to load because of large image files. Some lose visitors before the page even finishes loading. A slow site can mean fewer clicks and fewer sales — and often it’s just because of unoptimized photos.
2. My Photos Look Blurry After Resizing
You shrink your photo to make it smaller, and suddenly it looks dull or pixelated. It’s frustrating, especially when the photo looked perfect before. This happens when you don’t resize images correctly or compress them too much.
3. I Don’t Know Which File Format to Use
JPEG, PNG, WEBP — it’s easy to get confused. Many people just save their images without thinking about the best image format for web. Choosing the wrong one can make files too big or reduce quality.
4. I Don’t Have Time to Edit Every Photo
If you run a busy eCommerce store or handle hundreds of product photos, it’s tough to edit them all yourself. That’s why many clients ask us at Color Edit Pro to take care of everything — from bulk image resizing to photo retouching — quickly and professionally.
5. I Tried Free Tools, But the Quality Dropped
Free tools can help, but some make photos grainy or soft. Many clients come to me after trying different online image compressors that didn’t keep the original image quality intact.
Why Reducing Image Size Matters
Large image files can cause more trouble than you might think. Here’s what happens when your photo file size is too big:
1. Your website loads slowly
2. Google ranks your pages lower in search results (bad for SEO)
3. Visitors lose patience and leave
4. You lose sales opportunities
By learning how to reduce image file size without losing quality, you can make your website faster, improve SEO, and keep your images looking perfect on every device.
What to Check Before You Resize an Image
Before you start resizing photos, keep these simple things in mind:
1. Aspect Ratio
Always keep your image in the right shape.
- 1:1 (square) — best for social media images or product photos
- 16:9 — ideal for banners or videos
- 3:2 — works well for blogs and ads
2. Image Dimensions
Different platforms need different sizes:
- Instagram Stories – 1080×1920 px
- Website or blog – 1200–1600 px wide
- Product photos – 1000×1000 px (2000×2000 px if customers can zoom)
3. Resolution
- 72 DPI for web use (for optimized web images)
- 300 DPI for print (for high-resolution photos)
4. File Format
- JPEG – Best for web, small and sharp
- PNG – Great for transparency
- WEBP – Modern and light, keeps quality
Choosing the right file format is essential for image optimization and fast website loading.
How I Reduce Image Size in Photoshop Without Losing Quality
I’ve been using Adobe Photoshop for more than ten years, and this is the easiest wayy to resize images without losing clarity.
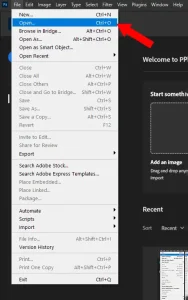
Step 1: Open Your Image
On the top-left corner of your screen, click File → Open.
Browse your computer and select the image you want to edit.
Shortcut: Press Ctrl + O to open an image quickly.
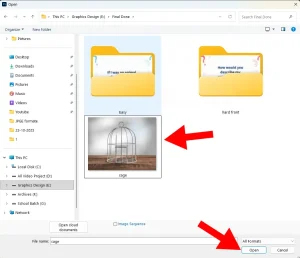
Step 2: Choose Your Image File
Navigate to your Desktop or the folder where your image is saved.
Click on your image and press OK to import it into your editing software.
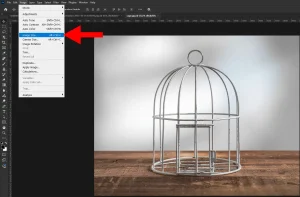
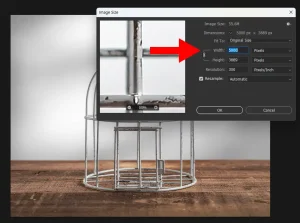
Step 3: Adjust Image Size
Go to the Image menu on the top-left toolbar.
Select Image Size to open the resize dialog box.
Shortcut: Press Ctrl + Alt + I to open Image Size directly.
Step 4: Set Your Desired Dimensions
In the dialog box, enter your preferred Width and Height values. Make sure the “Constrain Proportions” or “Maintain Aspect Ratio” box is checked to avoid distortion. Click OK when you’re done.
Pro Tip: For web images, try keeping file sizes under 200 KB for faster loading without visible quality loss.
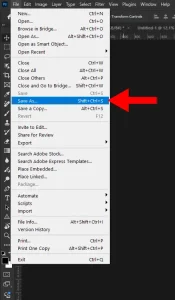
Step 5: Save Your Optimized Image
Click File → Save As to save your edited version. Choose a file format like JPEG, PNG, or WebP depending on your needs. Select your preferred save location and press OK.
Shortcut: Press Ctrl + Alt + S to open the Save As dialog instantly.
Best Free Tools to Make Image Files Smaller
Not everyone has Photoshop, and that’s okay. Here are some easy, reliable image compression tools you can use for free:
1. TinyPNG / TinyJPG – Drag, drop, done. Fast and simple.
2. Squoosh – A Google tool for easy image compression and previews.
3. ImageOptim – Great for keeping detail while removing extra data.
4. Let’s Enhance – AI-based tool to resize and sharpen photos.
5. Kraken.io – Works great for bulk image optimization for websites.
These tools help you compress photos for web without losing quality, perfect for bloggers, photographers, and eCommerce sites.
Helpful Plugins for Websites
If your website runs on WordPress or Shopify, these image optimization plugins can make the process automatic.
For WordPress
- WP Smush
- ShortPixel
- Optimole
- Imagify
For Shopify
- Crush.pics
- Avada SEO Image Optimizer
- Tiny SEO Speed Image Optimizer
These plugins compress and serve images in next-gen formats like WEBP, improving page speed and SEO performance automatically.
Tips from My Real Project
Here’s what works best for my clients based on real experience in photo editing and image optimization.
For eCommerce Product Photos
- Size: 1000×1000 px (2000×2000 px for zoomed views)
- File size: under 200 KB
- Background: white or transparent
- Format: JPEG for speed, PNG for transparency
- Use Bicubic Sharper when downsizing
For Headshots and Portraits
- Size: 400×400 px for web, 1200×1200 px for print.
- Format: JPEG or PNG
- Keep under 100 KB for fast loading
Using these settings ensures high-quality photos that load fast and look professional.
Why Clients Choose Color Edit Pro
Many clients come to me after struggling to reduce photo size without losing quality on their own. Some say their photos turned blurry; others say their sites slowed down after uploading large files. At Color Edit Pro, we handle all of that for you — from image resizing, photo retouching, and background removal, to ghost mannequin editing and color correction. We make every photo look professional, lightweight, and ready for web or print. So, you can focus on your business while we take care of the details.
Final Thoughts
Making your image files smaller without losing quality isn’t hard once you know the right way to do it. Start with the correct size, use the right settings, and test your results. And if you ever feel stuck or short on time, remember — we’re here to help. Need help optimizing your photos? Reach out to Color Edit Pro today, and we’ll make sure your images load fast, look sharp, and rank higher on Google.
Taking great photos is one thing, but making them look perfect online takes just a little extra care. Whether it’s for your website, online store, or social media, a few smart edits can make your pictures load faster and look more professional. In this post, you’ve learned how to make your photos smaller without losing that beautiful, crisp quality that grabs attention.
Make your pictures look clean, bright, and ready to impress.
Now you know exactly how to resize and optimize your images the right way. These simple techniques will help your website load faster, improve SEO, and keep your visuals looking professional. Try them out today and see how much better your photos can look when they’re properly optimized.
Don’t wait — your best images are just a few edits away. If you ever need a hand, Color Edit Pro is here to help make every photo sharp, light, and ready to shine online.