
What Is Product Photography? Types and Meaning 2026
October 23, 2025Edit Product Images for Immersive AR Shopping Experience 2026

Learn how to edit product images for immersive AR shopping experiences and boost e-commerce sales.
Edit product images to create an immersive shopping experience that feels real to your customers. You know how online shopping sometimes feels flat?
You see a picture, but you can’t touch it or feel it. That is where an immersive shopping experience comes in. It means your customers feel like they are almost holding the product in real life. They can imagine it in their room or in their hands. Today, this is super important for e-commerce product photos and AR apps.
If you want your customers to trust your product and buy more, you need great product image editing. You need photos that show real details. You need images that work well with AR shopping apps. AR stands for Augmented Reality. It is a tech that lets customers see the product in their real space using a phone or tablet. That makes shopping more real and fun.
In this blog, we explain, simply and step by step, how to edit product images for AR shopping. We will also show mistakes to avoid, tools to use, and tips for better images.
What is an Immersive Shopping Experience?
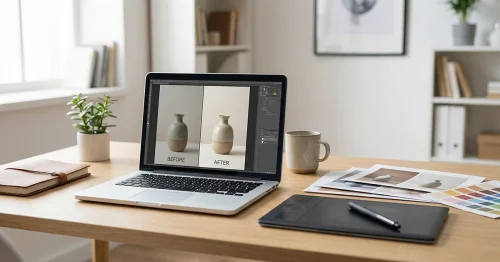
Walking in a store is fun. You can touch a shirt, feel the fabric, see the color in light, and turn it around. That is real shopping. Online shopping is different. You see flat pictures on a screen. You can’t feel the product. With AR, things change. You open a shopping app. You point your phone at your room. You see the product there. You turn it around. You can even see different angles. That is immersive. You feel like the product is really there. Good edited product images make this possible. It makes photos clean, clear, and realistic. Customers trust your product more. They buy more. See how properly edited product images make AR shopping immersive.

Why Edit Product Images for AR Shopping?
Editing product images ensures they are clear, detailed, and realistic. Here’s why it matters:
1. Better Quality – A blurry image makes customers unsure. Clear images help them trust.
2. Show Real Details – Customers want to see texture, edges, curves, and depth. Editing fixes lighting, color, shadows, and highlights.
3. Work With AR – AR apps need clean images. Background noise or wrong lighting makes images look fake.
When you edit product photos for AR, remove messy backgrounds, smooth edges, and adjust colors. This helps customers imagine the product in their room. Check out our Clipping Path & Background Removal Services if you want clean images fast. Also, when customers see clean and bright images, they feel confident to buy. This is why big e-commerce brands spend time and money on product image retouching.
Step-by-Step Guide to Edit Product Images
Here is how to edit your product photos for immersive shopping.
Step 1: Open Your Image
Editing starts with good pictures. Bad photos are hard to fix.
Shooting tips:
- Use natural light
- Simple plain background
- Multiple angles
- Focus on details
Clean photos make editing easy. For more tips on capturing high-quality shots before editing, check out our product photography guide.
For example, if you sell mugs, make sure the handle is clear. If you sell shoes, show the sole. Details matter.
Step 2: Remove Background Carefully
AR apps like clean images. Remove background using tools or editors.
- Keep edges smooth.
- Avoid jagged or rough cuts
Smooth images work better for AR.
Learn more in Image Masking Services. Even a small shadow behind the product can make it look like it is floating. Removing the background carefully keeps the product grounded.
Step 3: Adjust Color and Lighting
Colors must be real. Brightness too high or too low looks fake.
Adjust:
- Brightness
- Contrast
- Saturation
- Shadows and highlights
Good editing makes your e-commerce product photos realistic in AR apps. Check our Photo Retouch & Color Correction Services for help.
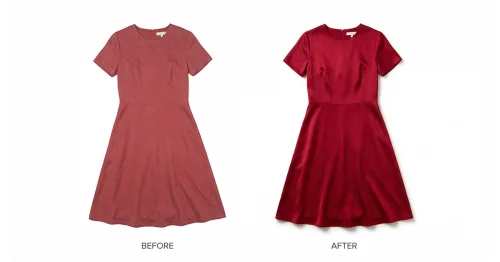
Example: If a red dress looks orange in the photo, the customer will feel cheated. Editing fixes that.
Step 4: Show Multiple Angles
One photo is not enough. Customers want front, back, side, and detail shots.
- Consider 360 views
- Show product turning around
More angles = more trust = more sales.
Imagine selling lamps. Showing only the front makes people unsure about the switch or cord. But showing all sides makes it feel real.
Step 5: Check Image Size and Format
AR apps and websites need the correct file size:
- Not too heavy
- Clear resolution
Balance speed and quality. Too big = slow website, too small = blurry.
You can use tools to compress images. This keeps your website fast and images sharp.
Step 6: Test in AR App
After editing, test images in AR. Open your site or app. Place the product in a real room.
- If it looks off, edit again
- Make sure the product feels real
Testing properly edited product images ensures immersive shopping and happier customers.

Common Mistakes in Product Image Editing
Avoid these mistakes:
1. Low Quality Photos – Bad photos = bad edits
2. Background Noise – Shadows or objects make AR fake
3. Over Editing – Too bright or colorful = looks fake
4. Not Testing in AR – Skipping AR test = bad experience
5. Wrong File Size – Too big = slow, too small = blurry
Fixing these keeps your AR images realistic.
Tools You Can Use
Even beginners can do product image editing with these tools:
1. Background Removers – Free online tools for clean images
2. Photo Editors – Adjust brightness, shadows, and color
3. AR Preview Tools – See how the product looks in real space
Some brands even use AI photo editing to save time. Adobe offers AI tools that can help remove backgrounds, enhance colors, and create 360-degree views.
How Immersive Shopping Helps Sales
Customers buy more when they trust the product. Immersive AR images help:
- See the product in their space
- Check multiple angles
- Feel product quality
Fewer returns happen, too. Happy customers = more sales.
For example, imagine a furniture store online. If a chair looks small in a photo, the customer might not buy. But in AR, they see it in their living room. Now it feels right. They are confident to buy.
Real Example
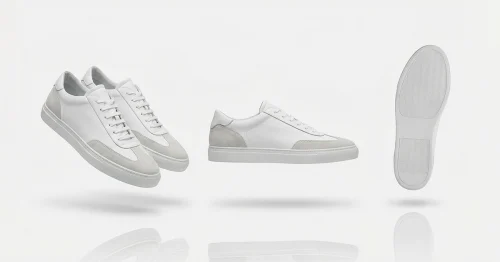
Shoes are a good example.
- One front photo = unsure buyer
- Many angles + AR = feel like trying the shoe
- Result = more trust and more sales
These tools help you compress photos for web without losing quality, perfect for bloggers, photographers, and eCommerce sites.
Tips for Better Editing Even If You Are Not a Pro
1. Use natural light
2. Remove background
3. Keep colors real
4. Smooth edges
5. Test in AR
6. Show many angles
7. Correct file size
8. Don’t over-sharpen edges
9. Keep textures natural
10. Label images correctly for SEO
Simple steps = realistic e-commerce images.
Final Thoughts
Product image editing is more than pretty photos. It helps immersive shopping experience in AR apps. Customers see real products, trust them, and buy more. Even simple edits can make a big difference. Start today. Shoot well, edit carefully, test in AR, and watch your e-commerce sales grow.
Remember, immersive shopping is the future. Customers want it. Make sure your images are ready.
Taking great product photos is just the first step. Making them look perfect online requires some extra care. Whether it’s for your e-commerce store, website, or social media, a few smart edits can make your images sharper, smaller, and ready for immersive shopping experiences.
Make your pictures look clean, bright, and ready to impress.
With these techniques, your product images will look bright, clear, and ready to impress. Optimized images improve site speed, SEO, and customer experience while keeping visuals professional.
Don’t wait—small edits today can make a big difference. Start optimizing your product photos and give your customers an immersive shopping experience that keeps them coming back.